Fayes Place

Fayes Place

Friday, 16 April 2010

The next couple of rounds.


Hello,

Well, it's been a while, but here I am with the next two rounds of my little Round Robin (RR). I had to add curves and then rectangles. I'm quite pleased with how it is coming along.


I'm not sure about the "real" one that I have to do now. It is getting a little dark and I would like to bring it back lighter if I can, but am not sure how it will look. Guess I'll just have to have a little play with it LOL.

There is only one more round after this one - anything goes in "Free Choice". Sometimes I need more boundaries than that to get my creative juices going. On mine? Maybe just a couple of borders? I'll keep looking at it for a while and maybe something will come.

It's been fun and I'm looking forward to getting my original block back, all done!

Cheers,
Faye.

Saturday, 10 April 2010

CONTINUOUS BAND PRAIRIE POINTS (or Picket Fence)

This is my first tutorial - someone on my on-line group wanted to know how I did my Continuous Prairie Points, so I decided to "have a go". I hope you can follow it.

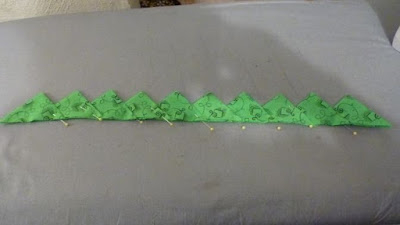
This is a finished strip.
Using this method, the points are always evenly spaced and the same size. I like to work on lengths of about 20”, so you could use fat quarters but there would be more wastage.

My example is based on a 4” original square. You can make them any size, but I find on a quilt the 4” is quite large enough, and when I have made 5” it really doesn’t make much difference to the finished size of the Point but uses quite a lot more fabric. I use a 3” on cushions.


1. Cut an 8” wide strip the width of the fabric (selvege to selvege). The 8” is twice the basic square size. Trim off the selveges


2. With wrong sides together, fold the band in half lengthwise. Press well. You need to be able to see the centre fold line.


3. Open the fabric out and with the wrong side up, begin working from one end. On the top side of the pressed centre line, mark lines from the centre fold to the edge, starting 4” from the end.


4. On the bottom side of the centre line, your first mark will be half the square size (in this case 2”), and from then on every 4”, so that the lines either side of the centre fold are staggered.

5. Cut away the 2” marked piece (you cant make a point out of that!). Then cut all the marked lines, from outer edge to the centre fold line. Be careful not to cut past the fold. I like to do this with scissors, cos I cant judge properly where to stop with the rotary cutter. This is when I cut the length in half (along the centre fold, between 2 staggered cuts).

6. Working at the ironing board so that the folds can be pressed as you go, place the fabric wrong side up. Assuming you are right handed, you will be working from the right hand side to the left. Press the first square into a half square triangle, working away from the iron, so that the fold goes from the bottom right to the top left. Press all the squares along this side the same way.

7. Press the bottom squares, also away from the iron, so the fold goes from the top right (fold line) to the bottom outer edge.


8. Now for the Points! Take the top of the first triangle and fold it back down on itself (the top of the triangle comes back down to the beginning folded edge) to make another smaller triangle. It’s a Prairie Point, but it’s joined at the fold!


9. Flip this small triangle down, so that when you fold the bottom triangle up, this first one is enclosed in the second triangle.


Pin to hold in place. Make sure the pin heads are on the straight edge.


10. Flip these 2 Points up and fold down the next triangle and pin to keep in place.


11. Keep flipping and folding back, then pinning, until you reach the end of the strip.


12. Press well but carefully (especially if your pins are plastic heads).

You might end up with lots of 20” strips of triangles, but believe me, if you have to move a 40” strip of loose cut squares it takes ages to straighten it out! 20” is much more user friendly.


How much fabric, you ask? Well, you measure the length of the sides and work out how many cuts of 40” (width of the fabric ) you need and cut that many 8” strips.


To join to your quilt. Trim the edges of your quilt, then pin the batting and backing out of the way. Join the Prairie Points to your quilt top, right sides and raw edges together, with a ¼” seam. You will find that you can ease or stretch the lengths to fit quite easily. But, if you find that it just isn’t working, cut 3 or 4 points individually and space them to fit right to the corner. There will not be a point on the corners. It just doesn’t work that way, even if you cut them individually.

Trim the batting an extra ¼”; hand sew the backing in place along the seam line at the back of the Points.

* * * *
And there you have it. My very first online tutorial. I often do quick workshops on this at retreats or craft days. Once you get the hang of it, it's quite easy.

Cheers,
Faye.
Wednesday, 24 February 2010

Mini quilts


Hello,
My online group have a Mini Round Robin swap (or 3 or 4) happening and some of us made a couple of centres (only 4.5") before we made one that we deemed good enough to send. This is mine at the moment - it's 10.5" (10" finished) and I now have to add a round of "curves". I think I know what I'll add and will post another photo when it's done ..... may take a while LOL. I cant post pictures of those that I'm working on for others, just in case they look at my blog. Dont want to spoil the surprise when the mini is returned to the owner.

This one, when I'd finished the centre it was a bit "rectangular" rather than square. I've fudged it and now it's square, but the centre still looks skewiff. But, I like it, and that's all that matters. The rounds were - compliment centre, -triangles, -squares, and now -curves, and next -rectangles, and lastly -your choice.

I was going to put some more photo's up of what I've been doing the last few weeks, but think I'll leave that for another day. Maybe I'll have time to write more on the weekend - and take some more photo's :-)

Cheers for now,

Faye.


Saturday, 30 January 2010

Sewing day at Ellen's


G'day,
Yes, well .... not a lot of sewing was done - a lot of talking, laughing, a bit of eating, and lots of good company. A bit of show n tell as well. Was great catching up with folk again, and of course, I forgot the camera!

I was doing a bit on my hexagons, which, like most hexagon projects, is a long on-going project. I've been making rosettes from scraps ever since the kids were small and every now and then I make up a project using them. That's it on the right. The little pink strip is actually a 6" ruler to show the size of the haxagons. The design is based on one that I've seen on another blog and it's a bit like Topsy - just keeps on growing. Dont know what it will be eventually, but I'm having fun with it. It's my project when I dont have a project.

The image on the left I call "My Secret Garden" and I made it in 1998. It's about 18" x 24".

I feel a machine quilting day coming on - just have to get rid of this hot weather. I'd just like to finish off 2 or 3 tops and I'll feel like the PHD pile is diminishing. I havent counted, but there must be about 20 tops to be quilted. 2010 IS THE YEAR OF COMPLETION!! I'm still trying to work on the "finish 3 before I start another" - but do little crafty items count as "new"? I'll have to hold myself back, cos they do take time to make, even tho they are small.

So, that's it for another week.

CU
Cheers,
Faye.


Sunday, 24 January 2010

Too hot.

Hello

Yep, it's been 'too hot' to do much, so I've been clearing out books and sorting out, ready for my move to a larger room. There was talk about "the view from my sewing room window" recently. Well, the room I'm in now doesnt have an outside window - we built on another room, so my window looks into that room (which has large windows so I get the light). My new room will look over a garden with a nice red hibiscus and some geraniums and pelargoniums. I'm hoping to get some lavender and rosemary growing just outside the window. We were going to do some painting this week, but it was too hot. Anyhow, I still havent finished clearing out my "stuff. Wonder if I ever will *LOL*

I was looking thru my button collection and I didnt have any large buttons, and not many green ones, so when DH and I went to the markets today I rectified the situation. I bought about 30 large buttons and half a dozen green ones. That will fix that problem for a while.

I havent taken any photo's this week, - been slack in that department too. I'm not handling the heat as well as I used to. Mind you, being overweight doesnt help :-(

So, with nothing much to report, I'd better go and get some tea - before the tennis starts again.

Cheers,
Faye.


Saturday, 16 January 2010

My Laundry.


Hi there
I noticed on someones post that they had a wall hanging in their laundry, so I thought I'd show you my laundry. There are 5 doors - and 2 of them have signs ... this one is (of course) the Loo.


Then there is the
Bathroom. I love this one. Wish my legs were as sleek and slender LOL


and this is the washing machine cover and a close up of the centre applique. I made the borders out of scraps - some that I have had for years, but the overall effect I think is good - nice and clean and crisp.

The other doors? A walk in cupboard/storeroom, the back door entrance, and the door into the kitchen.

I've had fun doing this entry. It has been a learning curve, but I think I have it now. I've decided I'll try and do a weekly entry, on either Saturday or Monday. If I have a definite time when I'd like to post then I might do it. And the more I do, the better I'll get at it. Plus if I post regularly I'll have to finish off things so I can show the photo's LOL.

Till next time.....
Faye.


Sunday, 10 January 2010


Hello,
I've been sewing like mad the last couple of weeks - I've finished off some things and (o-oh) started another. But this one is one that I want to make up with view to teaching "how to" a bit later. I was given the pattern and instructions and told if I could make sense of them, then let the store know. Well. I have nutted it out, so will call the store next week and see if they are interested in my teaching a class. Nothing ventured, nothing gained! :-)

I cant post photo's of all that I've finished, as I still havent decided what my mystery class will be in my Xmas in July retreat. Each year I try and have a mystery workshop for the group. Last year I had trouble finding something. This year I already have 2 to choose from.

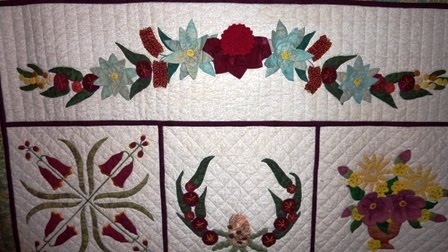
I have recently taken photo's of my "Wildflower Quilt" that I finished in August.
Well, I've uploaded these two, but wanted to have them one above the other. Cant work out how to change it at the moment. Never mind. This is my wildflower quilt. The one I have of it altogether is not the best, so here you see the blocks. There is a lot of 3D in the applique, and I made it QAYG - otherwise it would stay as a top, probably indefinitely LOL.


This block is one I made using a block from Bonnie Hunter's latest challenge. The small black border is 3D. I love the block. Dont know what I'll do with it yet, so it's hanging on my display board for the moment.